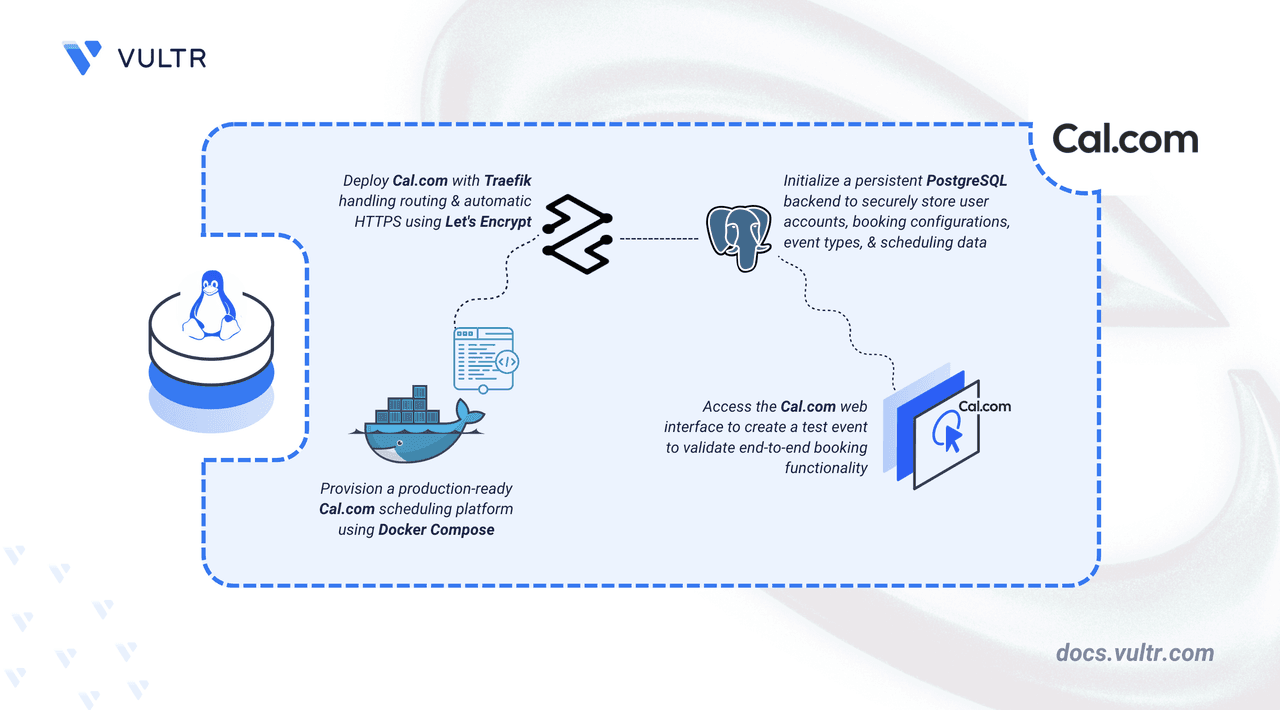
Cal.com v6.2.0 is an open-source scheduling platform that gives you full control over your booking data, unlike proprietary services like Calendly. This guide walks through deploying it on Ubuntu 24.04 using Docker Compose, PostgreSQL for persistence, and Traefik as a reverse proxy with automatic HTTPS via Let's Encrypt.
Prerequisites
- Ubuntu 24.04 server with a non-root sudo user.
- Docker and Docker Compose installed.
- A domain name (e.g., cal.example.com) with an A record pointing to your server's IP.
Step 1: Generate Secrets
Cal.com requires two random secrets. Generate them with:
openssl rand -base64 32
Run this command twice. The first output becomes NEXTAUTH_SECRET, the second becomes CALENDSO_ENCRYPTION_KEY.
Step 2: Create Directory Structure and .env File
mkdir calcom && cd calcom
nano .env
Add the following configuration, replacing placeholders with your domain, email, and secrets:
NODE_ENV=production
DOMAIN=cal.example.com
LETSENCRYPT_EMAIL=admin@example.com
NEXT_PUBLIC_WEBAPP_URL=https://cal.example.com
NEXTAUTH_URL=https://cal.example.com
ALLOWED_HOSTNAMES=["cal.example.com"]
NEXTAUTH_URL_INTERNAL=http://calcom:3000
AUTH_TRUST_HOST=true
NEXTAUTH_SECRET=REPLACE_WITH_GENERATED_SECRET
CALENDSO_ENCRYPTION_KEY=REPLACE_WITH_GENERATED_ENCRYPTION_KEY
DATABASE_URL=postgresql://calcom:calcompass@postgres:5432/calcom
DATABASE_DIRECT_URL=postgresql://calcom:calcompass@postgres:5432/calcom
CALCOM_TELEMETRY_DISABLED=1
CAL_SIGNATURE_TOKEN=self-hosted
Important: NEXT_PUBLIC_WEBAPP_URL is a build-time variable. If you change it later, recreate the container with docker compose up -d --force-recreate.
(Optional) Add SMTP variables for email notifications; without them, booking confirmations and password resets are disabled.
Step 3: Docker Compose Manifest
Create docker-compose.yaml:
nano docker-compose.yaml
Paste the following:
services:
  traefik:
    image: traefik:v3.6
    container_name: traefik
    restart: unless-stopped
    command:
      - "--providers.docker=true"
      - "--providers.docker.exposedbydefault=false"
      - "--entrypoints.web.address=:80"
      - "--entrypoints.websecure.address=:443"
      - "--entrypoints.web.http.redirections.entrypoint.to=websecure"
      - "--entrypoints.web.http.redirections.entrypoint.scheme=https"
      - "--certificatesresolvers.le.acme.httpchallenge=true"
      - "--certificatesresolvers.le.acme.httpchallenge.entrypoint=web"
      - "--certificatesresolvers.le.acme.email=${LETSENCRYPT_EMAIL}"
      - "--certificatesresolvers.le.acme.storage=/letsencrypt/acme.json"
    ports:
      - "80:80"
      - "443:443"
    volumes:
      - /var/run/docker.sock:/var/run/docker.sock:ro
      - ./letsencrypt:/letsencrypt

  postgres:
    image: postgres:15
    container_name: postgres
    restart: unless-stopped
    environment:
      POSTGRES_USER: calcom
      POSTGRES_PASSWORD: calcompass
      POSTGRES_DB: calcom
    volumes:
      - ./postgres-data:/var/lib/postgresql/data
calcom:
image: calcom/cal.com:v6.2.0
container_name: calcom
env_file:
- .env
depends_on:
- postgres
expose:
- "3000"
labels:
- "traefik.enable=true"
- "traefik.http.routers.calcom.rule=Host(${DOMAIN})"
- "traefik.http.routers.calcom.entrypoints=websecure"
- "traefik.http.routers.calcom.tls=true"
- "traefik.http.routers.calcom.tls.certresolver=le"
- "traefik.http.services.calcom.loadbalancer.server.port=3000"
volumes:
- ./calcom-data:/data/app/.data
restart: unless-stopped
Key points:
- Traefik v3.6 handles TLS termination and automatic certificate renewal via Let's Encrypt.
- PostgreSQL 15 stores user data and configurations.
- Cal.com container is not directly exposed to the host; Traefik routes traffic to it on port 3000.
- Persistent volumes: `./postgres-data`, `./calcom-data`, `./letsencrypt`.

## Step 4: Start the Stack

```bash
docker compose up -d
Verify all containers are running:
docker compose ps
Expected output shows three containers: traefik, postgres, and calcom.
Check Cal.com logs to confirm startup:
docker compose logs calcom
Look for a line starting with "Ready in" — that confirms the app is serving on port 3000.
Step 5: Initial Setup
Open https://cal.example.com/auth/setup in your browser. Complete the wizard:
- Create an admin account (username, name, email, password).
- Choose AGPLv3 license (free) or enter a commercial key.
- Enable integrations (Calendar, Conferencing, Payment).
- Set up profile: timezone, calendar connection (Apple/CalDav), video app (Campfire/Discord), availability (default M-F 9-5), and bio.
Step 6: Test Booking
- Navigate to Event Types → + New.
- Enter title, description, duration (e.g., 30 min). Save.
- Copy the booking URL (link icon in top-right).
- Open in incognito, pick a time slot, fill in name/email, confirm.
- Return to dashboard → Bookings to verify the booking appears.
If the booking shows up, your deployment is fully functional.
Why This Matters
Self-hosting Cal.com gives you complete ownership of scheduling data, no vendor lock-in, and full customization. This setup uses industry-standard tools (Docker, PostgreSQL, Traefik) that are production-ready and maintainable.
Next Steps
- Configure SMTP for email notifications (see Cal.com docs).
- Set up backups for the
postgres-dataandcalcom-datadirectories. - Explore Cal.com's API for custom integrations.


